Introduction: A Clean Feeder Is Part of Feeding Birds Well
Bird feeders need regular cleaning. The exact timing depends on what the feeder holds, how wet the weather has been, and how much bird traffic the station gets.
The calendar gives the backup rhythm. The feeder’s condition decides urgency. A tube feeder can look clean from the porch while the bottom cap holds a wet plug of millet and sunflower hulls after one wind-driven rain.
A quick check takes less than a minute: look for seed hulls packed in the bottom cap, damp seed around ports, droppings on tray edges, cloudy nectar, and sticky residue where birds place their bills. Those clues matter more than a neat-looking exterior.
This guide walks through three decisions: the normal cleaning interval, the signs that override the schedule, and a wash-rinse-dry routine that leaves the feeder ready for safer refilling.
What's Inside
- The short answer by feeder type
- Why some feeders get dirty faster
- A residue-free cleaning routine
- Same-day cleaning triggers
- Feeder-specific notes for tube, tray, suet, nectar, and window models
- Ways to make the routine easier
- What cleaning can and cannot do
The Short Answer: A Simple Cleaning Schedule by Feeder Type
Start with the public baseline from Project FeederWatch safe feeding guidance: clean seed feeders at least once every two weeks, and clean more often during heavy use or wet weather.
That baseline works best when the feeder stays dry. Nectar feeders, wet trays, and window feeders usually need a tighter routine because moisture and bird contact build up faster.
Backyard Bird Feeder Cleaning Schedule| Feeder type | Starting schedule | Clean sooner when |
|---|---|---|
| Seed tube feeder | Every 10 to 14 days in dry conditions | Seed clumps at ports, hulls pack into the bottom cap, or rain reaches the seed |
| Hopper feeder | Every 7 to 14 days | Seed near the lip gets damp, snowmelt runs into corners, or old seed remains under fresh seed |
| Platform or tray feeder | Every 3 to 7 days, with debris removal whenever visible | Droppings, leaf bits, wet seed, or sprouting seed collect on the feeding surface |
| Suet cage | Every 7 to 14 days | Greasy crumbs collect, suet softens, or residue sticks in cage corners |
| Window feeder | Every 5 to 7 days | Moisture sits in back corners, suction-cup seams, or under the tray roof |
| Nectar feeder | Every 2 to 5 days, depending on heat and cloudiness | Nectar turns cloudy, ports feel slimy, or insects collect in the liquid |
Quick Tip: Wet seed, clumped seed, mold, droppings on feeding surfaces, cloudy nectar, slime at ports, or a visibly sick bird at the station overrides the calendar.
Why Some Feeders Get Dirty Faster Than Others
Cleaning frequency follows feeder design. Enclosed tubes hide mess. Open trays display it.
Moisture changes the decision fastest. A feeder that stayed dry overnight can remain on schedule. One hit by rain, snowmelt, or sprinkler overspray may need emptying the same day.
Moisture and food type set the pace
Dry seed in a protected tube feeder tends to last longer between cleanings than seed spread across an exposed tray. Once seed gets damp, it can clump around ports, wedge into seams, and turn the bottom of a feeder into a packed layer of hulls and fines.
Nectar behaves differently. Cloudiness, sour smell, insects, or slime at ports calls for prompt cleaning because birds touch those ports repeatedly with their bills.
Bird feet change the risk on trays
Platform and tray feeders deserve a daily visual check because birds stand directly in the food area. Hulls can block drainage holes. Droppings land where the next bird feeds.
A platform feeder under a leafy tree may need attention the morning after a storm because seed, leaf bits, and droppings collect on the same flat surface.
Window feeders need close inspection
A window feeder may stay visually tidy from indoors but trap moisture behind suction cups or in clear plastic back corners. Condensation can sit in places that look clear from the kitchen side of the glass.
Remove the feeder to inspect it. Looking through it is not the same as cleaning it.
How to Clean a Bird Feeder Without Leaving Residue Behind
Scrubbing comes before disinfecting. That order matters because packed hulls, greasy suet crumbs, and dried nectar film can shield residue from the cleaner.
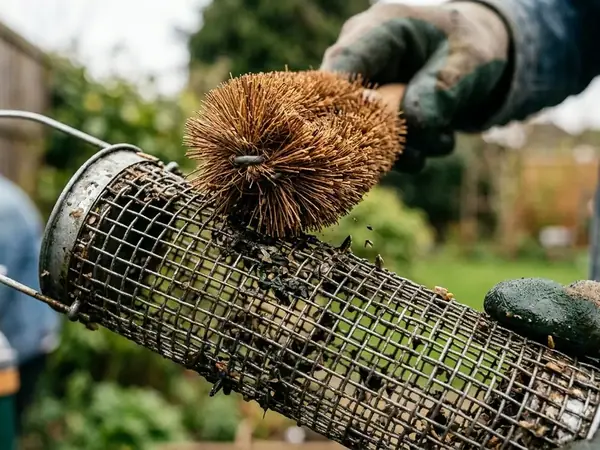
Tube feeders

- Empty old food. Discard spoiled seed, old nectar, greasy crumbs, and any food touched by droppings. Do not dry wet seed on a tray or towel and put it back into the feeder.
- Disassemble removable parts. Take off caps, bases, bee guards, trays, perches, and bottles when the design allows it.
- Knock loose hulls into the trash. Dry debris comes out more easily before washing.
- Brush ports and seams. Use a feeder brush for broad areas, a small bottle brush for tube bottoms and nectar ports, and an old toothbrush for tight seams.
- Wash with hot soapy water. Work through feeding ports, bottle neck threads, tray corners, roof edges, and bottom caps.
- Rinse until no suds remain. Residue left behind can contaminate the next refill.
- Disinfect according to guidance or the product label. If using the Project FeederWatch bleach dilution, use 1 part bleach to 9 parts water.
- Rinse again when required. After bleach, rinse thoroughly.
- Dry completely before refilling. This step is not decorative. Damp seed quickly becomes a problem in enclosed feeders.
Useful tools include disposable or washable gloves, a bucket or utility sink, a clean drying towel, and a separate scoop used only for fresh seed.
Note: Do not clean feeders alongside food-prep dishes unless the sink, counter, brush, and surrounding area can be separated and sanitized afterward.
Do Not Wait: Signs a Feeder Needs Cleaning Today
Some signs are not scheduling questions. They are same-day cleaning cues.
Use smell, texture, and color
- Sour odor
- Blackened residue
- Cloudy nectar
- Clumped seed
- Slime at nectar ports
- Droppings on feeding surfaces
- Dead insects in nectar
- Seed sprouting in a tray
Watch the weather, not just the date
Rain entering a seed tube, wind blowing leaf litter into a tray, snow melting into a hopper lip, or repeated freeze-thaw cycles can make food unsafe faster than the normal schedule suggests.
After a storm, check the feeder before refilling it. Topping off damp food hides the problem and makes the next cleaning harder.
Pause when bird behavior raises concern
If birds appear lethargic, unusually tame, fluffed for long periods, or visibly crusted around the eyes, pause feeding rather than simply refilling. Do the same if multiple birds with warning signs visit the same station.
Empty the feeders, clean them, and check local wildlife or bird-health resources before restarting.
Feeder-by-Feeder Notes: Tube, Tray, Suet, Nectar, and Window Models
The fastest inspection starts with the parts in hand. Ports, perches, caps, seams, drainage holes, bottle necks, bee guards, suction cups, and corners each collect a different kind of mess.
Check each seed port, perch joint, bottom cap, and narrow seam. Damp sunflower hulls or millet often wedge near the base after rain, even when the upper seed column still looks dry.
Tray and platform feeders
Scrape visible hulls and droppings when seen. Keep drainage holes open. Empty seed that remained wet after rain instead of topping it off.
Suet cages
Remove softened suet film, greasy crumbs, and residue from cage corners. Warm spells deserve extra attention because suet can smear instead of breaking cleanly.
Nectar feeders
Scrub ports, bottle neck threads, bee guards, base channels, and any area touched by cloudy or fermenting liquid. Small bottle brushes earn their place here.
Window feeders
Remove the unit from the glass. Wash the tray and roof, clean suction cups, inspect back corners, and dry the feeder before reattaching it so moisture is not trapped against the window.
Make the Routine Easier: Placement, Portion Size, and Storage
The easiest feeder to clean is the one that never becomes a rescue job.
Fill seed feeders with an amount birds usually finish before the next cleaning check, especially in damp seasons. A packed reservoir looks efficient until old seed sits in the base under a fresh pour.
Placement matters too. Put feeders where an adult can remove them without a ladder for normal cleaning. A feeder that is awkward to reach is more likely to be topped off over old food.
Seed storage belongs in the routine. Use a dry, sealed container, and keep the scoop for fresh seed separate from tools used on dirty feeders.
If the household owns two similar feeders, rotate them. One can hang while the washed one dries fully for several hours or overnight.
Scope and Limits: What Cleaning Can and Cannot Do
Cleaning reduces obvious contamination risks. It does not make a crowded feeding station risk-free.
Public feeder-hygiene guidance supports safer habits, but yard conditions vary with weather, feeder density, local bird traffic, and food type. In a shaded, rainy yard, the clock runs differently.
This guidance is for ordinary backyard feeder care. It is not veterinary diagnosis, wildlife rehabilitation, or disease outbreak management.
When sick or dead birds appear repeatedly, pause feeding, empty and clean feeders, clean the surrounding area where practical, and consult local wildlife authorities or bird-health resources before restarting.
Summary: Clean by Condition First, Calendar Second
Summary: Keep a regular cleaning rhythm, then clean sooner whenever the feeder tells a different story.
- Use Project FeederWatch’s seed-feeder baseline as the starting point, then adjust for wet weather, heavy use, and feeder style.
- Clean the same day when food is wet, spoiled, clumped, contaminated with droppings, or exposed to storm debris.
- Let washed feeders dry completely before refilling, especially tube, hopper, and window models where damp seed can sit in enclosed corners.
- Pause feeding and seek local guidance if several birds show warning signs. Cleaner food alone is not the right response to repeated illness at a station.