Give the Hanger Strength and the Cup a Watertight Seal
A leaking homemade ant moat can leave ants reaching the nectar. An insecure connection can drop a filled hummingbird feeder. A useful build addresses both problems separately: a continuous metal hanger carries the feeder, while a small watertight cup surrounding that hanger holds plain water across the ants’ route.
That division makes troubleshooting straightforward. Water beneath the cup points toward the seal. Movement at an eye or connector calls for checking the hanging hardware. Each deserves its own inspection.
The design below uses a threaded metal rod running through a plastic cup, with a closed eye at each end. Rubber washers seal the opening through the cup floor; metal washers spread the clamping pressure. Keep the water plain, without oils, insecticides, grease, petroleum products, or sticky coatings.
Match the Hardware Before Choosing the Cup
Start with the filled feeder’s weight and the hardware manufacturers’ instructions. Select the rod, eyes, connectors, and support for the combined weight of the fully filled feeder, water-filled moat, and hanging hardware. Follow the specified working loads, thread engagement, installation, and locking methods.
Gather these materials:
- A small, sturdy plastic cup with a flat bottom.
- Corrosion-resistant threaded rod and compatible closed eye nuts.
- Retaining nuts and broad metal washers.
- Rubber sealing washers suitable for the cup material and outdoor water exposure.
- The locking hardware specified for the fasteners, plus secure hanging connectors.
Match both thread diameter and thread pitch across the rod, nuts, and eyes. The cup needs enough flat area around its center for the rubber washers to seat fully. Molded ribs or a curved base can interrupt that contact.
Check the fit before drilling. The upper eye must clear the rim, leaving room for its connector and for pouring water. The lower eye must sit beneath the base with space for the feeder connector.
The load follows a direct route: support, upper eye, continuous rod, lower eye, connector, feeder. The cup clamps around that route without carrying the feeder’s weight.
For tools, prepare eye protection, a drill and suitable clearance bit, a stable work surface, backing that supports the plastic, and correctly sized wrenches.
Build the Washer Stack Around the Rod
Keep the feeder detached throughout assembly. Adjusting the cup seal is easier when feeder weight cannot pull on the hardware.
- Prepare the empty cup. Mark the center of its base. Support the plastic close to the drilling point, put on eye protection, and drill a clean clearance hole sized for the rod. Remove rough edges. Discard the cup if drilling cracks it.
- Arrange the parts from below upward. Place the lower closed eye with its specified locking hardware, lower retaining nut, broad metal washer, rubber sealing washer, cup floor, second rubber sealing washer, second broad metal washer, and upper retaining nut along the continuous rod.
- Center the sealing washers. Each rubber washer belongs directly against the cup floor. Its broad metal backing washer spreads pressure from the retaining nut. Check that both rubber washers cover the penetration evenly.
- Clamp gradually. Hold the opposing hardware with a wrench while tightening the retaining nuts. Aim for even washer contact. Stop before the plastic bows, splits, or becomes visibly crushed.
- Secure the eyes separately. Fit the upper closed eye above the rim. Engage and lock both eyes according to the hardware manufacturer’s instructions. Keep this task separate from tightening the cup-clamping nuts.
- Inspect the completed assembly. Look for displaced washers, sharp exposed edges, a distorted base, loose eyes, and connectors that could slip free.
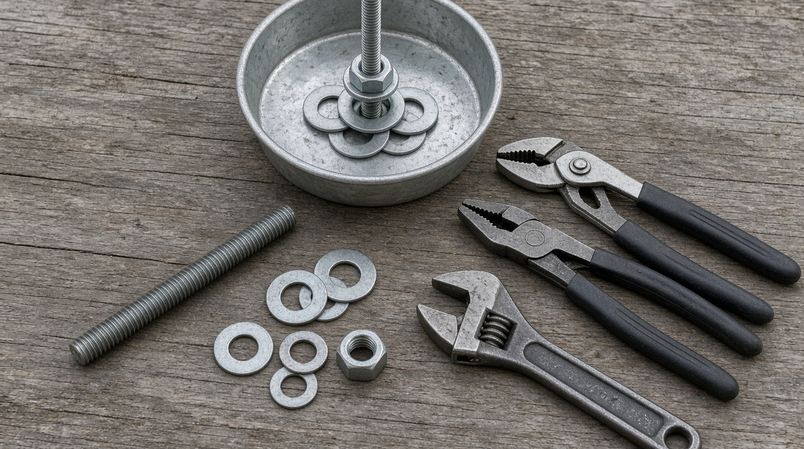
Properly seated rubber washers provide the primary seal. If compatible sealant is added around the penetration, choose a product suitable for the plastic, metal, and water contact after curing. Follow its full curing instructions before filling.
Keep Eyes Locked
Use the specified locking hardware on the load-bearing eyes. Adhesive belongs outside that fastening job, and extra pressure on the cup cannot secure a loose eye elsewhere.
Check Water Retention Before Applying Feeder Weight
Set the cup level over a dry tray. Fill until water surrounds the rod, then wipe the underside dry. Inspect the rod penetration and cup base for fresh moisture.
Water spilled over the rim can run down the outside and mimic a leak. Dry it away before judging the seal. Fresh moisture returning at the penetration calls for another look at the washer assembly.
Empty a leaking cup before adjusting it. Check for an off-center washer, debris under a sealing face, uneven compression, or cracked plastic. Correct the cause and repeat the water test rather than simply tightening harder.
Next, empty the assembly and check both eyes and the retaining nuts for movement. Resolve loose fittings using the specified locking and assembly instructions.
Using the intended support, suspend the assembly just above a clear, padded surface. Keep people and pets away from beneath it. Gradually transfer the fully filled feeder’s weight onto the assembly, checking for deformation, changing thread engagement, opening connectors, slipping hardware, or moving cup-clamping nuts before hanging it at normal height.
Pass Both Checks
A watertight cup and secure hanging connections are separate requirements. Check both before returning the feeder to service.
Place the Water Across the Ants’ Approach
Hanging position determines whether ants encounter the water. Attach the upper eye to the support and the feeder to the lower eye with secure, compatible connectors. Keep the cup upright and accessible.
Add plain water until it forms an unbroken barrier around the central rod, leaving space below the rim to reduce spilling. Picture the approach: an ant travels from the support to the upper eye, then down the rod until the rod enters the water.
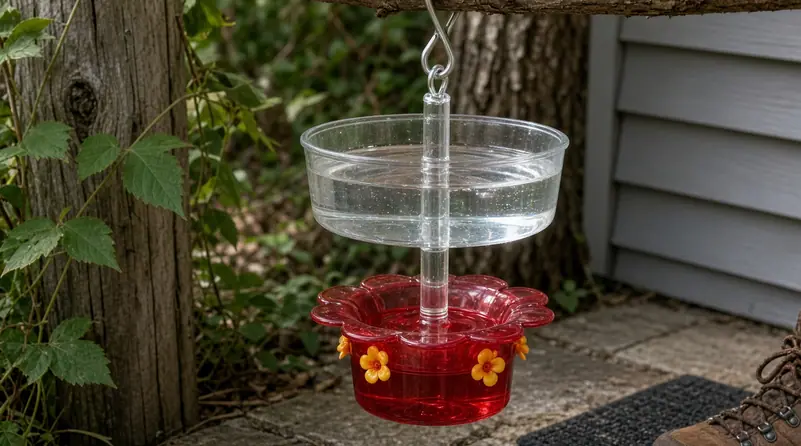
The moat interrupts the route through its water barrier; ants can still reach the feeder along a separate branch, wall, cord, or other dry connection. Inspect those contacts and remove or reposition them. Check inside the cup, too: a leaf spanning from the rim toward the rod can bridge the water.
Watch the assembly move in a breeze. Adjust the position or hanging arrangement if swinging repeatedly tips the cup or brings the feeder against a nearby surface.
Pair Water Checks With Every Feeder Service
Make the moat part of the existing backyard bird feeding routine. Whenever the feeder receives inspection or service, check that water surrounds the rod, remove leaves and insects, and confirm that the cup remains level.
Hot, dry, or windy weather calls for extra attention. Set the checking frequency by how quickly this particular cup loses water. Replace dirty water, clean accumulated residue, and rinse thoroughly before refilling.
- Empty cup: refill, then check for leakage.
- Fresh drips beneath the base: inspect the sealing washers and plastic.
- Ants despite standing water: trace dry contact routes to the feeder.
- Tilted cup: correct the hanging arrangement.
Overflowing the cup will not correct a tilt or remove a dry bridge. Restore a level barrier with space below the rim. Recheck eyes, nuts, connectors, and the cup for looseness or damage, especially after pronounced swinging or taking the assembly down.
Keep Refills Handy
Store a small, clean pouring container with the feeder-care supplies so the moat can receive fresh water without dismantling its connections.
Follow the Hanger at the Next Nectar Refill
At the next refill, begin the inspection at the support. Follow the upper eye down the rod to the water surface. Then examine the lower eye, feeder connector, and feeder for contact with branches, walls, or cords.
Level the cup, replenish the plain water below the rim, and confirm that the lower eye and connector remain securely engaged before leaving the feeder hanging.
The same metal rod that holds up the feeder becomes an ant bridge when the cup runs dry.